 | ||
| Your browser is not supported. | ||
|
Please browse our site using any of the following options:
| ||
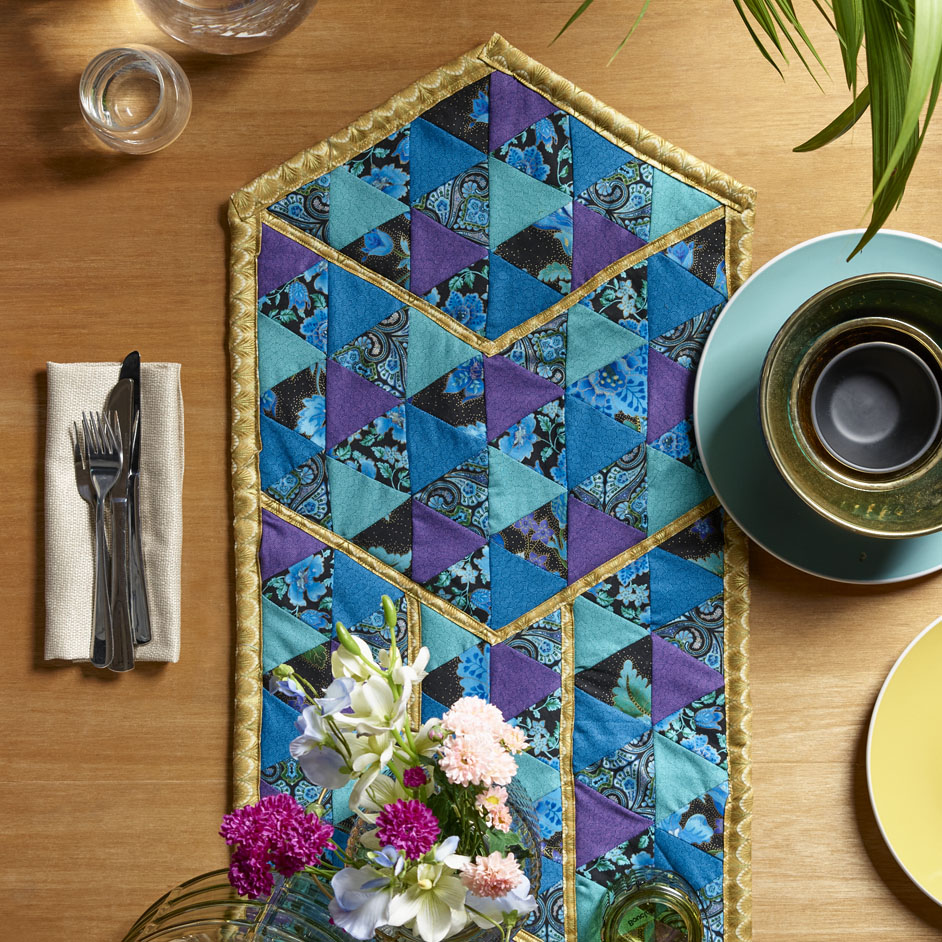
ARABIAN PEACOCK TABLE RUNNER

LEVEL: EASY
WHAT YOU'LL NEED:
- 20cm of quilting fabric in 6 different designs/colours. For this project I chose 3 patterned fabrics and three block colours which match the patterned fabric
- 50cm of quilting fabric to complete the piping and trim
- 1m of a backing fabric
- 50cm of wadding (wool was used for this project but you can use cotton or bamboo)
- Two spools of thread, one which is a base colour to sew the face together and the second to match the piping/trim
INSTRUCTIONS
Step 1. To start, cut 27 triangles from each of your 6 fabrics. Use a template to ensure your triangles are even, for this project I used a 9cm x 9cm template to create 8cm x 8cm triangles in the finished product.
Step 2. If you are well versed in sewing tumbling blocks you may feel comfortable to sew the face together in hexagons, otherwise start by lining up your 6 different triangles, with the three pattern triangles on the bottom and the three block triangles on the top.
Step 3. To sew two triangles together, turn one triangle over making sure the same two edges which sits side by side are overlapping, this is where we sew our line.
Step 4. Once you have sewn along this edge and unfolded you triangles you should be left with a diamond. Sew all six triangles (three diamonds) together and this will become
your basic pattern strip to follow throughout the table runner. Recreate this 6 triangle line up in the same order until you have 22 copies of your basic pattern strip. The remaining triangles will be used on the ends as we sew these basic pattern strips together.
Step 5. To recreate our geometric table runner you can start sewing these basic pattern strips together, while attaching additional triangles to the end (in the same pattern/colour order) to create 6 lengths.
- Length 1 (Three loose triangles, three pattern strips, four loose triangles)
- Length 2 (One loose triangle, four pattern strips, two loose triangles)
- Length 3 (Five loose triangles, four pattern strips)
- Length 4 (Two loose triangles, four pattern strips, three loose triangles)
- Length 5 (Four loose triangles, three pattern strips, four loose triangles)
- Length 6 (Four pattern strips, one loose triangle)
Step 6. Once you created your 6 lengths, line them up and sew together, mindful that they will get longer in the centre of the face to create the triangle ends to the table runner.
Once the face of your table runner is finished, lay over your backing fabric and cut the backing to match, do the same with the wadding and sit in between.
Step 7. Next we sew on our piping. This is created by cutting lengths of fabric at 3cm wide. With a hot iron, fold the 3cm strips over twice to make a neat ribbon. Pin these down to your table runner in whatever pattern you like, sewing with a thread the same colour on top and your base colour in the bobbin.
Step 8. To finish cut three lengths of your trimming fabric in 10cm strips. With a hot iron again fold a 1cm edge along each side of each length (making your strips 8cm wide) and then fold in half and iron again (you strip should not be 4cm). Pinning your trimming fabric to both the face and backing around each edge, making sure it is even on both sides, you can sew along the edge of your trimming to finish the border neatly (with your top thread and bobbin both matching the trimming fabric). Give one final iron across the entire table runner once complete.


