 | ||
| Your browser is not supported. | ||
|
Please browse our site using any of the following options:
| ||
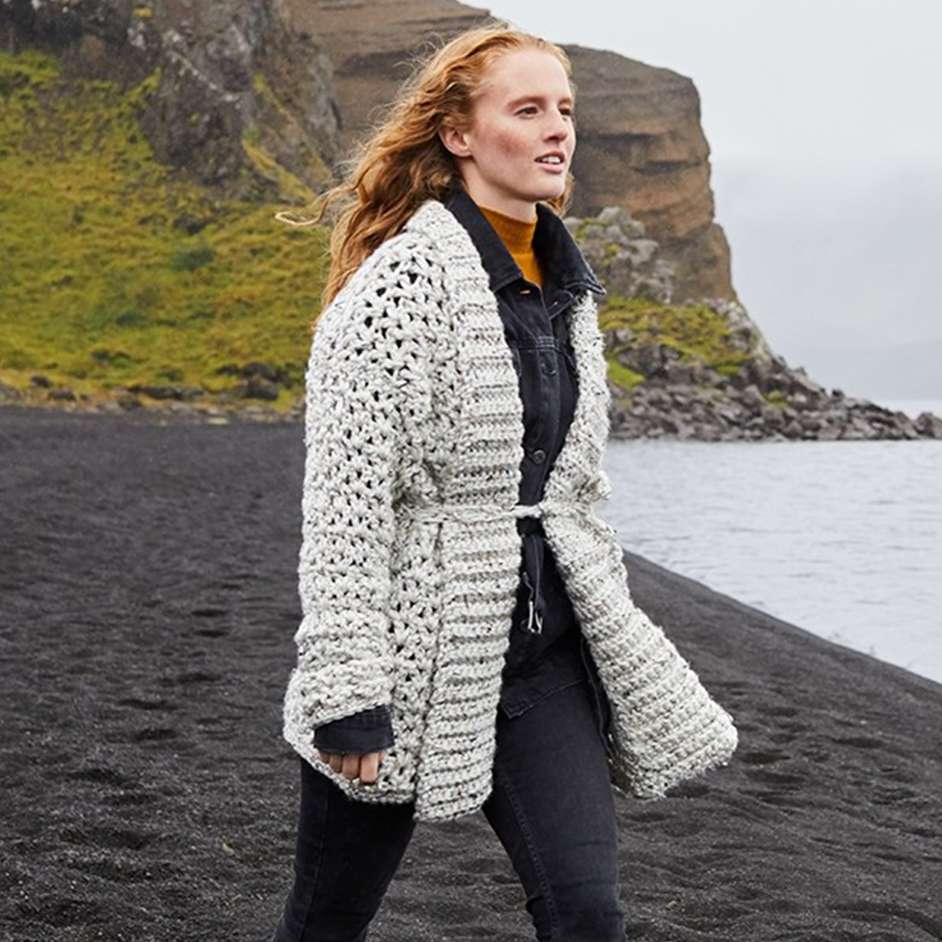
LION BRAND HOMETOWN USA CARDIGAN

LEVEL: EASY
WHAT YOU'LL NEED
- Lion Brand®
Instructions:
PATTERN STITCH
V-st Pattern (multiple of 3 sts)
Row 1: V-st in 5th ch from hook (5 skipped ch count as 1 base ch and tc), sk next 2 ch, *V-st in next ch, sk next 2 ch, rep from * to last ch, tc in last ch.
Row 2: Ch 3 (counts as first tc), turn, V-st in ch-1 sp of each V-st across, tc in top of beg-ch.
Rep Row 2 for V-st pattern.
NOTES
- Cardigan is worked in 6 pieces: Back, 2 Fronts, 2 Sleeves and Front Bands/Collar.
- Back, Fronts and Sleeves are worked in an easy V-st pattern. The 2 Fronts are worked the same, the pattern stitch is reversible so simply flip one Front over so that it is the mirror image of the other Front.
- Front Bands/Collar and optional Belt are worked in sc.
BACK
Ch 48 (54, 60, 66).
Row 1: Work Row 1 of V-st pattern - 14 (16, 18, 20) V-sts and 1 tc at each end of row.
Continue in V-st pattern for 16 (16, 17, 17) more rows.
Fasten off.
Shape Armholes
Row 1: Turn, join yarn with a sl st in 2nd tc of first V-st, ch 3 (counts as first tc), V-st in ch-1 sp of each V-st across to last V-st, dc in first tc of last V-st, leave rem sts unworked - 12 (14, 16, 18) V-sts and 1 dc at each end of row.
Continue in V-st pattern for 7 (8, 8, 9) more rows.
Fasten off.
FRONTS (make 2)
Ch 21 (24, 27, 30).
Row 1: Work Row 1 of V-st pattern - 5 (6, 7, 8) V-sts and 1 tc at each end of row.
Continue in V-st pattern for 16 (16, 17, 17) more rows.
Do not fasten off.
Shape Armhole
Row 1: Ch 3, turn, V-st in ch-1 sp of each V-st across to last V-st, tc in first tc of last V-st, leave rem sts unworked - 4 (5, 6, 7) V-sts and 1 tc at each end of row.
Continue in V-st pattern for 7 (8, 8, 9) more rows.
Fasten off.
SLEEVES (make 2)
Ch 24 (24, 24, 27).
Row 1: Work Row 1 of V-st pattern - 6 (6, 6, 7) V-sts and 1 tc at each end of row.
Row 2 (Increase Row): Ch 3 (counts as first tc in this and all following rows), turn, tc in first tc, V-st in ch-1 sp of each V-st across, 2 tc in top of beg ch - 6 (6, 6, 7) V-sts and 2 tc at each end of row.
Row 3 (Increase Row): Ch 3, turn, tc in first tc, tc in next dc, V-st in ch-1 sp of each V-st across, tc in next tc, 2 tc in top of beg ch - 6 (6, 6, 7) V-sts and 3 dc at each end of row.
Row 4 (Increase Row): Ch 3, turn, V-st in next dc, V-st in ch-1 sp of each V-st across, sk 2nd dc of last V-st, sk next dc, V-st in next tc, tc in top of beg ch - 8 (8, 8, 9) V-sts and 1 tc at each end of row.
Row 5: Ch 3, turn, V-st in ch-1 sp of each V-st across, tc in top of beg ch.
Rows 6-13 (17, 17, 17): Rep Rows 2-5 for 2 (3, 3, 3) more times - 12 (14, 14, 15) V-sts and 1 tc at each end of row.
Continue in V-st pattern until piece measures about 18 (19, 19, 20) in. (45.5 (48.5, 48.5, 51) cm) from beg.
Fasten off.
FINISHING
Sew shoulder seams. Sew in Sleeves. Sew side and Sleeve seams.
Sleeve Edging
From RS, join yarn with a sl st at wrist edge of one Sleeve.
Rnd 1: Ch 1, dc evenly spaced around edge, join with sl st in first dc.
Rnd 2: Ch 1, dc in each sc around, join with sl st in first dc.
Fasten off.
Rep edging on 2nd Sleeve.
Lower Edging
From RS, join yarn with a sl st in lower front corner so that you are ready to work across the lower edge of Cardigan.
Row 1: Ch 1, dc evenly spaced across lower edge of Cardigan.
Row 2: Ch 1, turn, dc in each dc across.
Fasten off.
Front Bands/Collar
Ch 11.
Row 1: Sc in 2nd ch from hook and in each ch across - 10 dc.
Row 2: Ch 1, turn, working in back loops only, dc in each dc across.
Rep Row 2 until piece measures about 145 (150, 155, 160 cm and fits along Left Front edge, around Back neck, and along Right Front edge of Cardigan.
Fasten off. Sew in place.
Belt (optional)
Ch 4.
Row 1: Dc in 2nd ch from hook and in each ch across - 3 dc.
Row 2: Ch 1, turn, working in back loops only, dc in each dc across.
Rep Row 2 until piece measures about 152.5cm from beg or desired length.
Fasten off.
Weave in ends.


